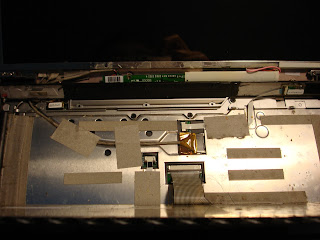
These are not complete take apart instructions. I only did what was necessary to remove the keyboard and replace the LCD display inverter.
Opening up the laptop display is just a little tricky. Only do this if you know what you are doing. I can't be held responsible if you mess up and ruin your laptop!
Before you begin, unplug your laptop and remove the battery. This may reduce the chance that you'll break your laptop by shorting power to ground.
Opening the Laptop Display
The first step is easy: pull off 5 small rubber bumpers to expose the Philips head screws that hold the laptop's display plastic together. You really only need to pull off the 4 at the corners, because the one at the top center doesn't hide a screw. I ending up with 3 white ones and 2 black ones.
Next, carefully pry off the top part of the plastic bezel of the case lid. It is held in place by 4 shallow plastic fingers along each of the left and right edges. At the top and bottom are two-sided sticky tape, which you can pry up gently. You'll have to hold open the case latch to remove the bezel from the lid base.

What you see now is the LCD panel held in place by a metal frame. Beneath it is the backlight inverter board. If your display goes dark, but you can still read it by shining a flashlight on the display, chances are you'll need to replace the inverter.
Replacing the Display Backlight Inverter
Replace the inverter if your display goes dark, possibly accompanied by a buzzing sound. Many of these inverters look similar, but either have different connectors or are otherwise incompatible. I found one for about $10 on eBay, part number MPT N19083-120091-1300.
Once you get the display open, removing the inverter is easy. One screw holds the inverter board to the lid base. Remove the screw carefully, supporting the back of the lid while you remove the screw.
Once the screw is out, rotate the inverter toward you. Carefully remove the two-wire connector with the red and white leads from the right edge of the inverter. Even more carefully, remove the multi-wire connector from the larger socket on the left.
Removing the Keyboard
All the fun is over, unless you need to remove the keyboard. You might perform this step if you need to replace the keyboard, or if you want to inspect the wires that run from the laptop base up into the display.
Looking at the laptop base, you'll see a black plastic piece that contains the Gateway logo on the left, and the power switch on the right. This piece is held in place by some plastic tabs and 3 tiny Philips screws that are normally hidden by the laptop battery. Flip the laptop over and remove these screws. Be careful not to lose them!
Once the screws are removed, it should be pretty easy to pry up the black plastic strip. Use caution in removing it, as there is a ribbon cable on the bottom that attaches to the power button.

The black plastic strip holds down the leading edge of the keyboard. Once the black strip is removed, you can remove the keyboard by tilting up the top of the keyboard. Pull outward to disengage black plastic tabs at the bottom of the keyboard. Note carefully that a ribbon cable attaches the keyboard to the base of the laptop.
If you need to remove the keyboard, detach the ribbon cable from the base. Push the keyboard ribbon cable fastener to disengage the ribbon cable from the base.
If you want to completely remove the black plastic strip, you can also disengage its ribbon cable by opening the clamp and pulling out the ribbon cable.

Remove the Hinge Covers
The case hinges are hidden beneath black plastic caps. Once the black plastic strip is removed, the hinge covers are held in place at the rear by two small plastic tabs. Opening the laptop lid to a wide angle allows you to tilt the hinge covers upward so you can pull them off.
The case hinges are hidden beneath black plastic caps. Once the black plastic strip is removed, the hinge covers are held in place at the rear by two small plastic tabs. Opening the laptop lid to a wide angle allows you to tilt the hinge covers upward so you can pull them off.

